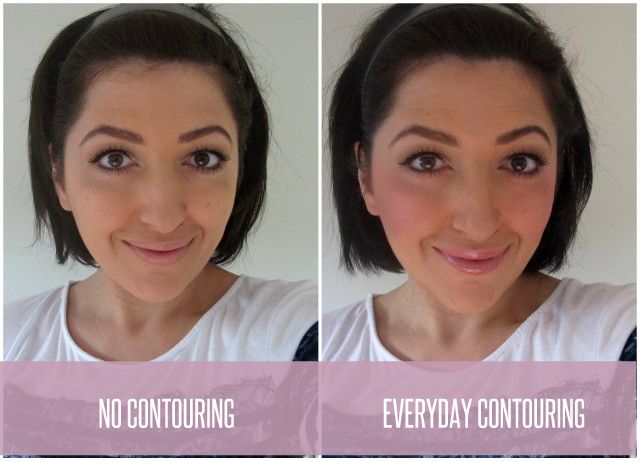
Chances are if you search for how to contour on Google or Pinterest you'll be left with lots and lots of images of women with brown and white stripes on their face. Those aren't your every day run of the mill contouring, but more like something to do for special occasions. It does make such a huge difference to the face, yet if I'm being honest it also looks scary to do! This tutorial isn't that special-occasion contouring, rather something anyone can do with a little matte bronzer or a powder a few shades darker than your natural skintone.
Products used
- Illamasqua sculpting duo* - you can use any matte bronzer or powder a few shades darker than your skin colour, or any of the products I mentioned HERE, but for this tutorial I'm using this duo from Illamasqua as it's the perfect contouring colour for me, plus it comes with added bonus of a highlighter.
- Illamasqua powder blush in Nymph - any blush will do of course, but on this day I was feeling the cool pink colour of this blush.
- Brushes - I've used a blush brush, a flat foundation brush and a mid sized eyeshadow brush by the brand Faulein38 (about $20 for a set of 32 on ebay), and the Models Prefer airbrush (about $14.95 from Priceline).
- Suck in cheeks and with a medium sized brush (e.g. a blush brush) apply contour powder in the hollows of the cheek and blend, blend, blend
- Apply contour powder under your jawline and blend, blend, blend
- With a small brush apply contour powder on the sides and under the tip of the nose and... yes, blend, blend, blend!
- (Optional) - If I'm also going to highlight my face I generally apply highlighter on top of my cheekbones before I apply a blush. This way the highlight looks more natural and gives a lit-from-within glow rather than the straight out shine you might see if you apply highlighter on top of a blush.
- Apply your favourite blush.
There, easy peasy. Sure, it's not as dramatic as the images you see on Google, but it's still quite effective at adding some dimension to my face.
How do you feel about contouring? Yay or nay?
*Press sample


Yay all the way for contouring! :) Doing it every day myself, one of my favorite things about makeup :) You look really pretty, with and without contouring ;-)) And what a beautiful color of that blush! x
ReplyDeleteThanks Karla! The blush is so pretty isn't it? It's one of my favourites xx
ReplyDeleteI always apply highlighter after blush - d'oh! Sometimes the best tips are the little, easy "do it this way instead!" ones, aren't they? Thanks Lilit :)
ReplyDeleteOh you can do whichever you like, I generally apply before blush so I only get a subtle highlight but if you want more then definitely do it after blush. There are no right or wrong ways! xx
Delete